Was this article helpful?
Transferring Items
As a multi-store owner, you have various options to move inventory between your stores and warehouse. This article will guide you through the process of transferring your inventory items. You will need to enable security settings to allow your users to transfer items.
Topics in this article include
-
Security
-
System Parameters (Expert Only)
-
Creating a Transfer Customer
-
Transfer Delay
-
Transfer Types (Elite Only)
-
Transferring Bulk and Serialized items from Item Availability using Transfer Now
-
Transferring Bulk and Serialized items from Item Availability using Future Transfer
-
Creating a Transfer Contract
Security
Before we start the transferring process, you'll need to confirm your users have certain security settings enabled. If they do not have permission to create transfer contracts, the Transfer Contract option will not be available or greyed out. If you are on Elite you will need to make sure that your users are able to transfer to the correct store, district, region, and or company.
Here's how to get there
Expert: Program Menu > Security > System Security
Elite: Configuration Gear > System > Security
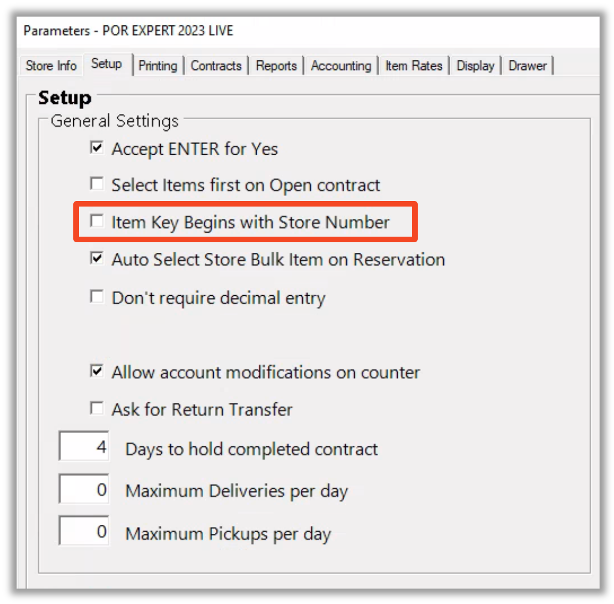
System Parameters (Expert Only)
To properly use the transfer features, if you are on Expert, you must ensure that the box for Item Key Begins with the Store Number is checked.
Here's how to get there
Program Menu > Configurations > System Configurations > Parameters > Setup Tab
-
If this is checked, then the item keys must begin with the store number. For example, 1AER would be for store #1, 2AER for store #2, etc.
-
If this is unchecked, then the item keys must end with a hyphen followed by the store number. For example, AER-1 would be for store #1, AER-2 for store #2, etc. If the inventory you want to transfer does not have the proper format for the item records at both stores, then the system cannot transfer the equipment. The inventory cannot be mixed.
-
ALL the inventory has to be in the same format. If an item is transferred, then an entry will be made in the item's edit history.
Creating a Transfer Customer
This is typically used in the event industry for transferring items for a temporary period between store locations.
Before you begin, it is important that you have your transfer customers set up in your database. You need to go into File Maintenance and add a new customer. For a store 1 transfer the customer key needs to be XFER-1, XFER-2 for store 2, etc.
Note: The transferred contract will now automatically select Use Same Address from the transfer customer’s record. Make sure you set the store’s address in the XFER customer for each store.
You also need to be sure that any serialized items you are transferring have a header record. The header record should have a store location of 000 and a current location of 000.
Transfer Delay
Transfer delays are useful in providing a more accurate picture of when an item will be available in a specific store. Please see our article on Store Transfer Delay for more information.
Transfer Types (Elite Only)
In Point of Rental, we have multiple transfer types. The system will only expose the one-way transfer option from the Universal Search in Elite by default. If you would like to utilize the Round-Trip Feature, you will need to enable it in your configurations.
Here's how to get there
Elite Browser > ⚙️ > Transaction > select Transfer Types. Please see our article on Round Trip Transfers for more information.
Transferring Bulk and Serialized items from Item Availability using Transfer Now
You can use the same transfer customers that are used for bulk transfers (XFER-1, XFER-2, etc.), but when you select non-bulk item(s) Point of Rental does not ask for time. The system assumes the item(s) will be staying at the other store until further notice.
- Here's how to get there
Item Availability > Inventory > Store Transfer > Transfer Now
- If the transfer is for a serialized item, you can select the specific serialized item you want to transfer.
- Select the store that you want to transfer to.
Note: When you click on the All Stores button within Item Availability, you will get a listing of each store’s quantity owned and the quantity available daily for a week. - Round Trip or One Way Transfer? The system will also prompt the user if they want to create a one-way or round-trip transfer. To see this prompt, there must be a transfer customer with an Xfer-1,-2, etc key. If not, the system will automatically create it as a one-way transfer.
Please note, this feature is available in Elite versions 2025.17 and above.
Multi-Store Availability - When you are looking at the weekly availability for a header item (i.e. right-click on an item and select Item Availability), you can select all stores from the store drop-down menu. This option displays a line for each of your stores, listing the availability for each one. This lets you quickly see which store has the items you need in stock.
Extra Charges - When transferring items between stores, the system has always transferred the purchase cost associated with that item. The system will now also transfer the extra charges associated with the item.
Transferring Bulk and Serialized items from Item Availability using Future Transfer
You can also create a transfer contract from Item availability.
Here's how to get there
Item Availability > Inventory > Store Transfers > Future Transfer
Follow the prompts after and you will be taken to the contract.
Creating a Transfer Contract
Before you begin, please ensure that your transfer customer is set up in your database. Please see Creating a Transfer Customer for this information.
Transfer Contracts can be made from the Counter System in Expert, the Transactions Menu in Elite, and the Universal Search from Elite.
- Once you click on New Contract from the Counter System or Transaction Menu, you will click on Transfer Contract as your contract type. From the Universal Search, you will hover over Contract > Transfers > and select the Transfer option that you would like to use.
From Universal Search
From the New Contract Screen
-
This will bring up the screen below, asking which store or service truck you are transferring the items into. You will be able to transfer from one service truck to another or from a service truck to a store. Also, you will be able to do this from Item Availability.
-
Once the store is selected, you will be asked if you are transferring the item now or later. If you are transferring now, the inventory selection menu will be brought up just like any other contract you are opening.
-
Round Trip or One Way Transfer? The system will also prompt the user if they want to create a one-way or round-trip transfer. To view this prompt, a transfer customer with an Xfer-1, Xfer-2, etc. key is required. If not, the system will automatically create it as a one-way transfer.
Please note, this feature is available in Elite versions 2025.17 and above.
-
If you are transferring the item later, you will be asked for the date and time to create a transfer reservation.
-
Select the header of the item you are transferring.
-
Once the item is added, you will be asked how long the transfer will be. This is where you input the amount of time the items will be away from your store. For example, if the other store only needs items for the weekend, you would probably make a reservation for Thursday, lasting 5 days, so that the items can be returned on Monday.
-
Add in the quantity and you will see a negative and a positive qty of the number of items you added. In the example below, a Skid is being transferred from store 2 to store 1. Once it is added, you will see the status on the item line as a reservation. The contract status will show as Transfer.
Note: If there are package items attached to this item, you will be asked if you would like to transfer those items as well. This will only show the negative and positive lines if the item is a bulk item. Serialized items will only show a single-line transfer. -
In Day at a Glance, you will see the reservation under the Transfer Out tab. When you send out the reservation, you will be prompted to enter the serialized unit being transferred. The item will be added to the transferred contract.
-
Once the item is sent out, in Day at a Glance, it will transition from a reservation to an open contract. Also, the contract will move out of the Transfer Out tab. The inventory will be removed from your store and will now be listed under the Transfer In tab for the other store. When the receiving store closes the transfer contract, the items will be added to their store inventory. You can confirm by looking at the edit history of the item.
Note: If a serialized item has any repair/maintenance contracts or inspection jobs when transferred, those contracts/jobs will be assigned to the item’s new store. Purchase lines will also be transferred between items. If you are trying to transfer items you do not own, purchase lines will be created to compensate. However, this is not recommended, and the user could end up with skewed information.
Note: Transfers created from the line item in the contract will transfer the entire quantity of the line, not just the overbooked quantity.